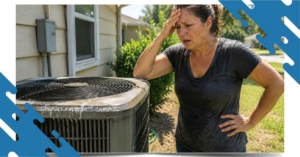
Have you ever heard your AC gurgling like it’s brewing coffee or noticed water pooling around your unit? Wondering if that’s normal—or a warning sign? Your AC condensate pump is likely in need of a little attention.
A condensate pump is a device used to remove the water (condensate) produced by HVAC systems, refrigeration units, and other cooling equipment. This water accumulates during the cooling process and must be drained away to prevent damage. When gravity drainage isn’t feasible—such as in basements, attics, or areas with limited slope—a condensate pump is employed to move the water to a suitable drainage point.
Many homeowners overlook this small but crucial component, yet it plays a vital role in keeping your AC running efficiently and preventing leaks, water damage, or costly repairs. So, what happens if your condensate pump clogs or fails? And how can you keep it in top condition without having to call a technician every time?
5 Easy Steps to Maintain Your AC Condensate Pump
Have you noticed water pooling around your HVAC system? Is your air conditioner shutting off unexpectedly or struggling to cool your home?
It could be your AC condensate pump.
While small and often overlooked, the condensate pump plays a critical role in removing moisture produced by your air conditioning system. When the pump becomes clogged, dirty, or fails, it can lead to water leaks, mold growth, reduced cooling performance, and expensive repairs. According to HVAC industry experts, routine condensate pump maintenance helps prevent overflows, improves system efficiency, and protects your home from moisture-related damage.
Follow these five simple steps to maintain your AC condensate pump and avoid unexpected HVAC problems.
Step 1: Turn Off Power Before Performing Any Maintenance
Before inspecting or cleaning your AC condensate pump, always disconnect the power supply.
Locate your HVAC breaker and switch it off. If the condensate pump is plugged into an outlet, unplug it as well.
Why is this important?
Water and electricity are never a safe combination. Turning off the power protects you from electrical shock and prevents accidental damage to system components while you’re working. HVAC professionals recommend shutting off power before performing any maintenance on condensate pumps, drain lines, or air conditioning equipment.
Pro Tip: If family members are home, place a note near the breaker to prevent someone from restoring power while you’re working.
Learn More: How To Keep Your Air Conditioner From Clogging After Months Of Summer Heat
Step 2: Inspect the Condensate Pump for Warning Signs
Once the power is off, take a few minutes to inspect the pump and the surrounding area.
Look for:
- Standing water near the unit
- Visible dirt or debris
- Algae or slime buildup
- Cracked or damaged components
- Loose tubing or drain connections
- Signs of mold or moisture damage
Ask yourself:
- Is water collecting around the HVAC unit?
- Does the pump appear dirty or neglected?
- Are there unusual odors coming from the area?
Even small warning signs can indicate a developing problem. Early detection can help prevent pump failure and costly water damage later.
Step 3: Clean the AC Condensate Pump Thoroughly
Dirt, algae, mold, and mineral buildup can accumulate inside the pump reservoir over time.
If left untreated, these contaminants can restrict water flow and cause the pump to stop working properly.
To clean the pump:
- Remove visible dirt and debris.
- Wipe down the exterior with a soft cloth.
- Inspect the float switch and ensure it moves freely.
- Clean the reservoir using warm water and mild soap.
- Rinse thoroughly and allow components to dry.
Avoid using harsh chemicals that may damage plastic components or internal parts.
Many HVAC professionals also recommend cleaning the condensate drain line and reservoir regularly to reduce algae buildup and maintain proper drainage.
Helpful Tip: During the cooling season, biological growth can develop quickly in humid environments. Regular cleaning can significantly reduce the risk of pump failure.
Step 4: Test the Condensate Pump After Cleaning
After cleaning, it’s important to verify that the pump is operating correctly.
Restore power and test the system.
If your condensate pump has a test switch, activate it. Otherwise, slowly pour water into the reservoir and observe how the pump responds.
A properly functioning condensate pump should:
✔ Turn on automatically
✔ Remove water efficiently
✔ Shut off when the reservoir empties
✔ Operate without unusual noises
Listen carefully for:
- Grinding sounds
- Loud vibrations
- Continuous running
- Gurgling noises
These symptoms may indicate a blockage, failing motor, or malfunctioning float switch.
Industry experts recommend testing the pump periodically to catch small issues before they become major repairs.
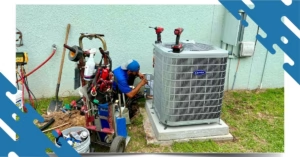
Step 5: Schedule Routine HVAC Maintenance
When was the last time your HVAC system received professional maintenance?
Even if your condensate pump appears to be working properly, regular inspections can help identify hidden issues before they cause system failures.
Experts recommend inspecting and cleaning condensate pumps at least once or twice per year, especially in high-humidity climates where algae and debris accumulate more quickly.
A professional HVAC maintenance visit can include:
- Condensate pump inspection
- Drain line cleaning
- Float switch testing
- Air filter replacement
- Electrical safety checks
- Overall AC performance evaluation
Routine maintenance helps:
- Improve air conditioner efficiency
- Reduce energy consumption
- Prevent water leaks
- Extend HVAC system lifespan
- Lower repair costs
Considering that HVAC repairs can cost hundreds—or even thousands—of dollars, preventive maintenance is one of the smartest investments a homeowner can make. And remember—if you ever feel unsure or spot something unusual during your routine check, don’t hesitate to call the pros.